Summary
 Example of Euro signs in Data View
Some SPSS data files contain variables that reflect amounts of money such as revenue or expenses. If so, you probably want to display the correct currencies in data view as well as your output tables and charts. This tutorial quickly shows how to do just that.
Creating Our Test Data
If you work on data containing amounts of money, chances are that you're working with large numbers. We'll therefore create some test data holding large numbers by running the syntax below. In step 2, we switch on digit grouping because it makes large numbers much more readable. Finally, we increase the variable’s format because or digit grouping is not visible if we don't.
SPSS - Create Test Data Syntax
data list free/amount.
begin data
1e7 -1e7 0 ''
end data.
*2. Display digit grouping.
set digitgrouping yes.
*3. Increase format in order to see digit grouping.
formats amount(f20).
Result

SPSS DOLLAR Format
Before going into Euro signs, note that one currency format is already present in SPSS by default: American Dollars, indicated by the $ sign. For using it, simply run something like
formats amount(dollar20).
Keep in mind two things here: first, running FORMATS does not change your data in any way; the actual data values are still just simple numbers. Changing their format only affects how they're shown. In this case, with a Dollar sign in front of them.
Second, using SPSS’ Dollar format -or any other currency- does not only affect the way your data look in data view; it also affects the tables and charts you may create after changing the format. You can easily see this by running something like
descriptives amount.
Result

Euro Signs in SPSS
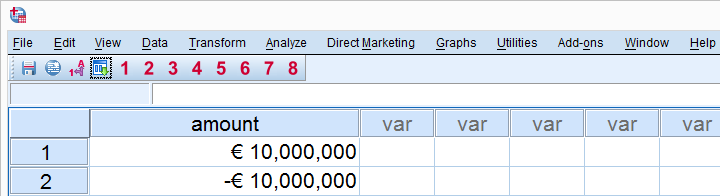
Using any other foreign currency than US Dollars in SPSS requires two steps. We first set a custom currency format (syntax below, step 1). We then specify this format for our variable(s) of interest.
set cca = '-,€ ,,'.
*2. Set cca as format for amount. Display 20 characters.
formats amount(cca20).
Result
How Does It Work?
SPSS allows you to define up to four custom currency formats. They're called CCA through CCD where “CC” is short for “Custom Currency”. A custom currency specification always consists of four parts, separated by three commas. The figure below clarifies the syntax.
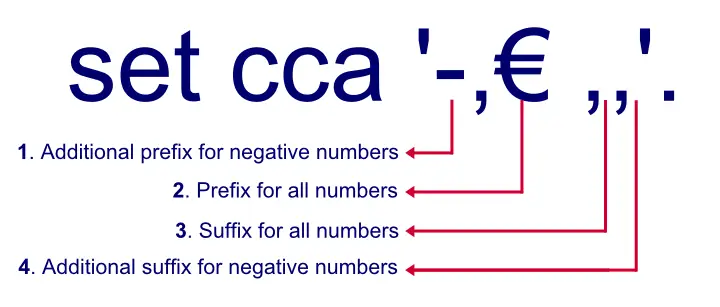
Note that each component may be empty. Like so, this example does not use a third or fourth component.
Second, one or more spaces may be added to each component. In our example, we added a trailing space to the Euro sign because we feel the numbers look slightly nicer like so.
Third, the additional prefix (if any) always precedes the prefix. Therefore, minus 100 Euros is always written as -€ 100, never €- 100. By the way: the SPSS notation (minus sign before Euro sign) is the correct option here but the other notation is not uncommon either.
Suffixed Amounts
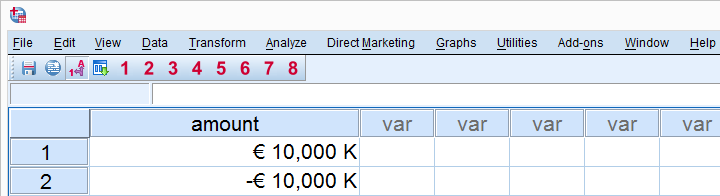
Large numbers have the tendency to clutter up your tables and charts. A nice way to avoid this is dividing all numbers by 1,000 and suffixing them with “K” (for “kilo” = 1,000). Alternatively, divide them by 1,000,000 and use the “M” suffix. Quick tip: dividing multiple variables by 1,000 in one go is easily accomplished with DO REPEAT.
compute amount = amount / 1000.
execute.
*2. Set Custom Currency B (ccb) to Euros with "k" suffix.
set ccb '-,€ , k,'.
*3. Set ccb as format for amount.
formats amount(ccb20).
Result
Final Note
Using foreign currencies in SPSS other than Dollars may seem a bit puzzling at first but really isn't so difficult. We hope you found this tutorial useful for getting a grip on this.
THIS TUTORIAL HAS 2 COMMENTS:
By LeesaJohnson on November 29th, 2016
This is very helpful for SPSS -Foreign Currencies Tutorial!
By Zahid Farid on October 23rd, 2018
I like this tutorial!