Definition
SPSS Insert is a command for running syntax files from within another syntax file. This may help keeping your syntax organized.
SPSS Insert Command - Why Use It?
- Executing all of your commands from syntax may be the single best practice for working with SPSS. One of the reasons is that you can correct steps early in the process and then rerun them together with all subsequent steps.
- However, your syntax file may become rather lengthy when you're working on larger projects. This may require scrolling and searching through many lines before you'll find what you're looking for.
- A nice way to keep your syntax organized is to break it up into different files. However, in case you'd like to rerun your syntax (due to corrections or accidentally damaging your data) you probably don't want to rerun several different files separately.
- The solution is to create a master syntax file that runs the other syntax files for you. This is done with the
INSERTcommand.
SPSS Insert Command - How to Use it?
 SPSS Insert Helps Keeping Syntax Organized
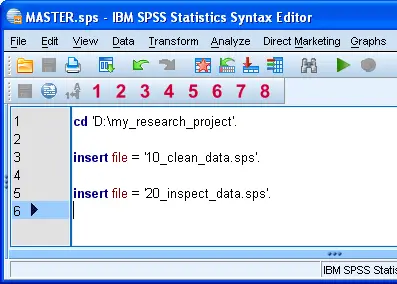
- First create the master syntax file. It's recommended you Change Your Working Directory here. Assuming all syntax files will reside in this folder, you can now just use their file names in any
INSERTcommands. Also, if you'd move the entire project to a different folder, you'd only have to modify a singleCDcommand. - Perhaps you'll then start cleaning up some of your data. You can create a separate syntax file for this, say "10_clean_data.sps". (Prefixing syntax files with numbers indicating the order in which they are run helps keeping things organized.)
- Next, you may want to inspect your data. You can create a separate syntax file for this too, for instance "20_inspect_data.sps".
- Now you can rerun your syntax by using
insert file = '10_clean_data.sps'as demonstrated by the screenshot.
SPSS Insert Command - Final Note
- Before
INSERTwas introduced in SPSS version 13, similar functionality was provided byINCLUDE. However, using the latter is a bit more complicated and may now be considered deprecated.
 SPSS TUTORIALS
THIS TUTORIAL HAS 1 COMMENT:
By Jeff Boggs on May 18th, 2019
Thank you for these instructions. I knew there had to be a way to do this, but was at a loss of how to do it.