Serious SPSS users have probably heard that
using Python in SPSS can dramatically speed up
your daily SPSS tasks.
So what is it and how does it work? This brief tutorial quickly walks you through.
- How does Python relate to SPSS?
- What Is Python Known For?
- Why Should I Use Python in SPSS?
- Where Can I Get Python for SPSS?
- Which are Some SPSS Python Examples?
Introduction
Python is one of the main general programming languages today and was first launched in 1989.
SPSS -short for “statistical package for the social sciences”- is user friendly software for data editing/analysis and statistical procedures. SPSS is much older than Python: it's already been in use since 1968. Originally, Python had nothing whatsoever to do with SPSS. They were simply 2 completely unrelated software packages until roughly 2005.
So How does Python relate to SPSS?
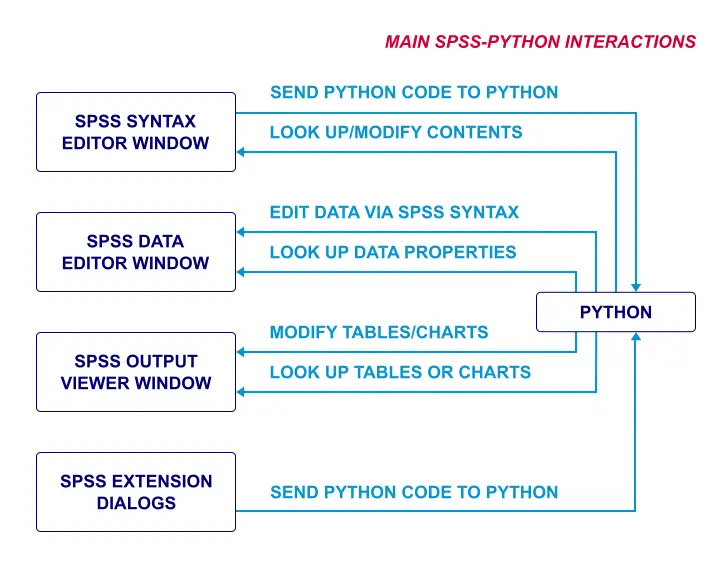
Around 2005, the SPSS developers created software that connects SPSS with Python: the SPSS-Python plugin. This plugin made it possible to
- send Python code to Python from SPSS;
- have Python look up anything in SPSS: variable names or labels, data values, output tables and more;
- use such information to create (large amounts of) custom-made SPSS syntax;
- have Python send such syntax back to SPSS and execute it;
- or, alternatively, have Python directly modify SPSS output tables & charts, syntax or data.
The figure below sketches some of such interactions between SPSS and Python.
What Is Python Known For?
- Python is among the most important programming languages in use today. It is open source software and it may be freely downloaded, used and distributed, even for commercial use.
- Python was deliberately designed to be intuitive and easy to learn, a programming language suitable for non programmers -which probably includes most SPSS users.
- Python easily handles a huge variety of tasks: it can read, write or modify text files, Excel files, MySQL databases, SPSS and much more.
- Python does a couple of things very differently than the bulk of programming languages. Especially its use of indentation for control structures (looping and conditional processing) is original but effective;
- Just like www.spss-tutorials.com, Python was invented and created in Amsterdam, the Netherlands.
Why Should I Use Python in SPSS?
- For some larger SPSS tasks, using Python for SPSS may decimate the amount of time and effort they require.
- Also, Python may drastically decrease the amount of SPSS syntax required by some tasks. Shorter syntax is much easier to read, adjust and correct.
- Some SPSS tasks are not possible at all with basic syntax but are easily accomplished by Python.
- There are no costs associated with using Python in SPSS.
- There's an ever growing number of SPSS extensions freely available that can be used from SPSS’ menu. Most of these require Python to actually run.
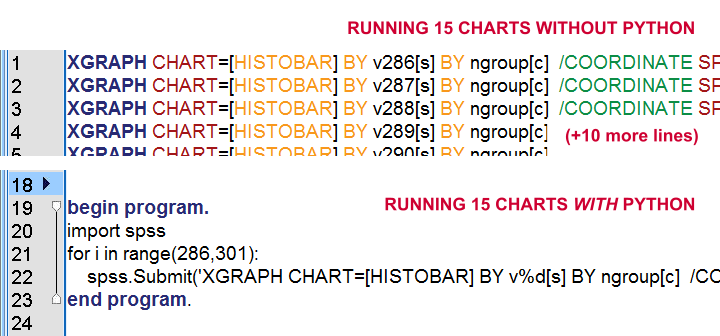 Which Approach Looks Better to You?
Where Can I Get Python for SPSS?
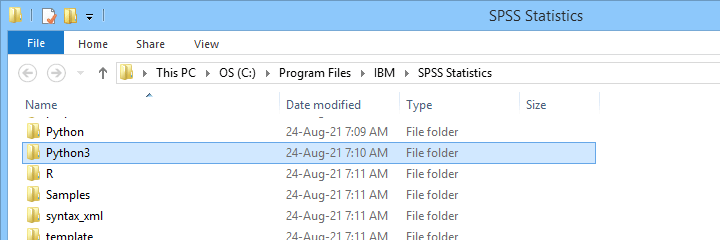
Finally an easy question... Recent SPSS versions are integrated with Python by default. It is located in the Python3 folder in your SPSS installation folder as shown below.
For more details on this, read up on Python for SPSS - How to Use It?
Which are Some SPSS Python Examples?
Some excellent SPSS-Python code is found in many of our SPSS tools:
- SPSS Mean Centering and Interaction Tool is super useful for moderation regression;
- SPSS - Recode with Value Labels Tool recodes values and moves their value labels from the old onto the new values;
- SPSS - Create All Scatterplots Tool runs scatterplots with(out) regression lines and tables for many pairs of variables in one go;
- SPSS - Clean Labels Tool performs text replacements over many value and/or variable labels;
- SPSS Create Dummy Variables Tool creates dummy variables for regression.
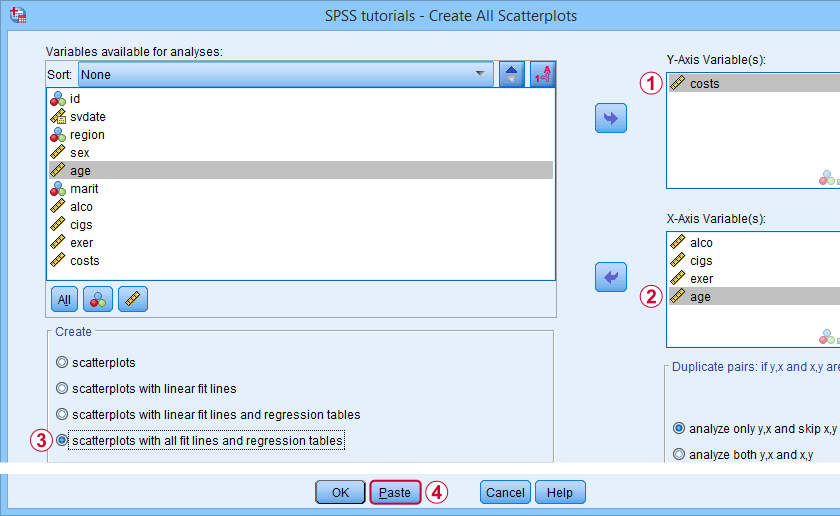 Example tool that uses Python for SPSS
Note: when using these tools, you don't immediately see the underlying Python code. However, if you unzip the SPSS extension (.spe) files, you'll find that each of them contains a Python (.py) file that contains the SPSS-Python code being used.
Thanks for reading!
 SPSS TUTORIALS
THIS TUTORIAL HAS 19 COMMENTS:
By Brian on July 18th, 2019
SPSS programmers are not non-programmers, they are just called that by IT and programmer types, almost none of whom understand the first thing about SPSS and never will.
By JACOB OLUDOYE OLUWOYE on March 7th, 2021
what is the purchasing cost of Python in SPSS?
By Ruben Geert van den Berg on March 8th, 2021
Hi Jacob!
For SPSS you need to purchase a license but adding Python to it doesn't cost anything extra!
In fact, recent SPSS versions automatically include Python when you install them.
Hope that helps!
SPSS tutorials
By roger u mangaoang on October 10th, 2021
i want to learn spss and to know the cost of this program