This tutorial explains SPSS’ AUTORECODE command and shows how to use it properly on nominal_strings.sav, a screenshot of which is shown below. We recommend downloading this data file and following along with the steps in this tutorial.

SPSS AUTORECODE - What Is It?
SPSS AUTORECODE creates a new numeric variable from a string variable. The string values are recoded into integer numbers (1, 2, 3 and so on). Each number then receives the string value it represents as a value label.
Regarding our data file, note in variable view that emot_1 through emot_5 are string variables. We'll now AUTORECODE the first one and inspect the result with the syntax below.
SPSS AUTORECODE - Syntax Example 1
autorecode emot_1 /into emo_1.
*2. Show values and value labels in following output tables.
set tnumbers both.
*3. Inspect result.
frequencies emo_1.
Result

Note in this table that the string values are first sorted alphabetically before they're assigned to numbers 1 and 2.
SPSS AUTORECODE - PRINT Subcommand
Whenever you use AUTORECODE, it's nice to see which string values are converted to which numeric values. We can have SPSS print this coding scheme in the output viewer window by simply adding a PRINT subcommand as shown below.
SPSS AUTORECODE - Syntax Example 2
autorecode emot_2
/into emo_2
/print.
Result

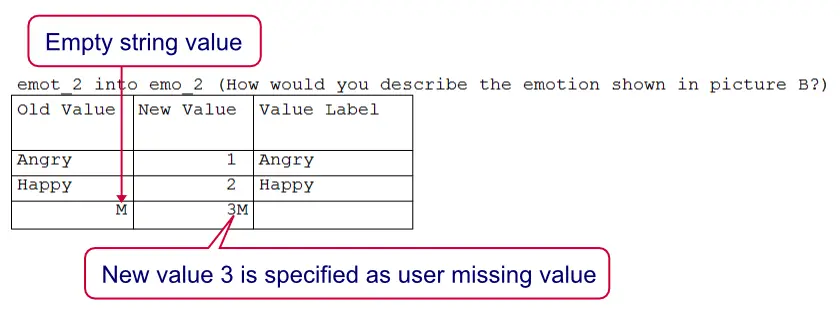
Note that there's something awkward here: it seems as if 2 new values are converted into 3 new values. What's going on is that the new value 1 indicates an empty (zero character) string value. In SPSS logic, that's just another distinct (and valid) string value.
We can see in data view that the second case indeed has an empty string value on emot_2.
SPSS AUTORECODE - BLANKS Subcommand
We just saw that AUTORECODE treats empty string values the same as non empty string values. However, we usually see empty string values as missing values and we like to have them recoded last. We can do so by adding a BLANKS subcommand as shown in the syntax below, step 2. Before doing so, we first delete all new variables.
SPSS AUTORECODE - Syntax Example 3
add files file */keep id to emot_5.
*2. Blank strings should become missing values in new variable(s).
autorecode emot_2
/into emo_2
/blank missing
/print.
Result

SPSS AUTORECODE - GROUP Subcommand
At this point, note that each AUTORECODE example we ran resulted in a different coding scheme. When we take a close look at our data, however, we see that our string variables mostly contain similar values. This suggests that the same answer categories were used for these 5 questions.
In this common scenario, we usually want to have our new variables consistently coded. That is, we want to have identical value labels over such a set of variables. This is accomplished by adding a GROUP subcommand as shown below.
SPSS AUTORECODE - Syntax Example 4
add files file */keep id to emot_5.
*2. Use same coding scheme for all variables
autorecode emot_1 to emot_5
/into emo_1 to emo_5
/group
/blank missing
/print.
Result

Note that we basically converted the entire data file in one go with our last command. However, there's one thing we don't like: value 2 is used for “Don't know / no answer”. There nothing really wrong with that but it's a bit awkward that this value is among the values used for emotional expressions.
AUTORECODE doesn't have any option for circumventing this but we'll now offer two ways for correcting it.
Option 1: Basic Syntax
One option here is to RECODE 2 into 7 and then adjust the value labels manually. Fortunately, we can do so for all relevant variables simultaneously as shown below.
recode emo_1 to emo_5 (2 = 7).
execute.
*2. Remove value label from 2 and apply value labels to 6 and 7.
add value labels emo_1 to emo_5
2 ''
6 '(Blank)'
7 'Don''t know / no answer'.
Option 2: Recode with Value Labels Tool
A much more elegant option for dealing with the “Don't know” values is using our SPSS - Recode with Value Labels Tool. After installing it, it can swap values 2 and 5 together with their value labels by running the syntax below.
SPSSTUTORIALS RECODEWITHVALUELABELS
VARIABLES = 'emo_1 to emo_5'
OLDVALUES = '2 5'
NEWVALUES = '5 2'.
 SPSS TUTORIALS