Process Multiple SPSS Data Files with Python
Running syntax over several SPSS data files in one go is fairly easy. If we use SPSS with Python we don't even have to type in the file names. The Python os (for operating system) module will do it for us.
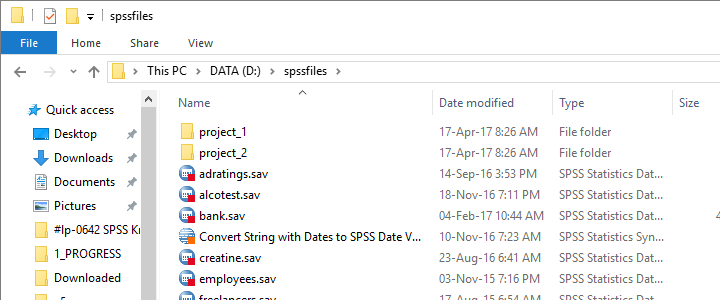
Try it for yourself by downloading spssfiles.zip. Unzip these files into d:\spssfiles as shown below and you're good to go.
Find All Files and Folders in Root Directory
The syntax below creates a Python list of files and folders in rDir, our root directory. Prefixing it with an r as in r'D:\spssfiles' ensures that the backslash doesn't do anything weird.
begin program python3.
import os
rDir = r'D:\spssfiles'
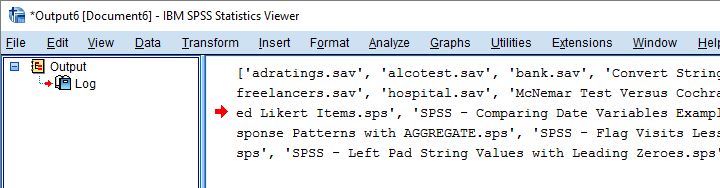
print(os.listdir(rDir))
end program.
Result
Filter Out All .Sav Files
As we see, os.listdir() creates a list of all files and folders in rDir but we only want SPSS data files. For filtering them out, we first create and empty list with savs = []. Next, we'll add each file to this list if it endswith(".sav").
begin program python3.
import os
rDir = r'D:\spssfiles'
savs = []
for fil in os.listdir(rDir):
if fil.endswith(".sav"):
savs.append(fil)
print(savs)
end program.
Using Full Paths for SPSS Files
For doing anything whatsoever with our data files, we probably want to open them. For doing so, SPSS needs to know in which folder they are located. We could simply set a default directory in SPSS with CD as in
CD "d:\spssfiles".
However, having Python create full paths to our files with os.path.join() is a more fool-proof approach for this.
begin program python3.
import os
rDir = r'D:\spssfiles'
savs = []
for fil in os.listdir(rDir):
if fil.endswith(".sav"):
savs.append(os.path.join(rDir,fil))
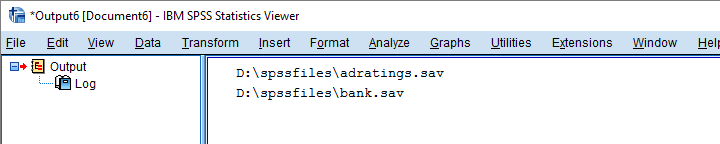
for sav in savs:
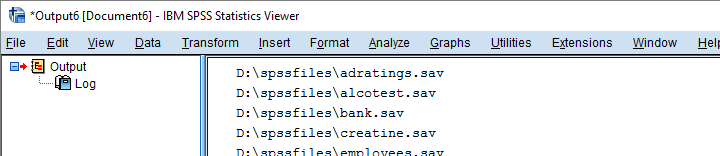
print(sav)
end program.
Result
Have SPSS Open Each Data File
Generally, we open a data file in SPSS with something like
GET FILE "d:\spssfiles\mydata.sav".
If we replace the file name with each of the paths in our Python list, we'll open each data file, one by one. We could then add some syntax we'd like to run on each file. Finally, we could save our edits with
SAVE OUTFILE "...".
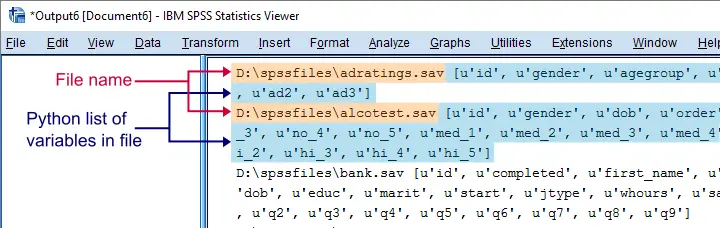
and that'll batch process multiple files. In this example, however, we'll simply look up which variables each file contains with spssaux.GetVariableNamesList().
begin program python3.
import os,spss,spssaux
rDir = r'D:\spssfiles'
savs = []
for fil in os.listdir(rDir):
if fil.endswith(".sav"):
savs.append(os.path.join(rDir,fil))
for sav in savs:
spss.Submit("GET FILE '%s'."%sav)
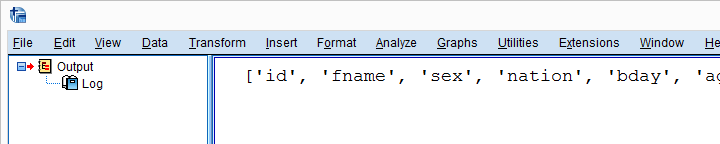
print(sav,spssaux.GetVariableNamesList())
end program.
Result
Inspect which Files Contain “Salary”
Now suppose we'd like to know which of our files contain some variable “salary”. We'll simply check if it's present in our variable names list and -if so- print back the name of the data file.
begin program python3.
import os,spss,spssaux
rDir = r'D:\spssfiles'
findVar = 'salary'
savs = []
for fil in os.listdir(rDir):
if fil.endswith(".sav"):
savs.append(os.path.join(rDir,fil))
for sav in savs:
spss.Submit("get file '%s'."%sav)
if findVar in spssaux.GetVariableNamesList():
print(sav)
end program.
Result
Circumvent Python’s Case Sensitivity
There's one more point I'd like to cover: since we search for “salary”, Python won't detect “Salary” or “SALARY” because it's fully case sensitive. I you don't like that, the simple solution is to convert all variable names for all files to lower()case.
A basic way to change all items in a Python list is
[i... for i in list]
where i... is a modified version of i, in our case i.lower(). This technique is known as a Python list comprehension and the syntax below uses it to lowercase all variable names (line 13).
begin program python3.
import os,spss,spssaux
rDir = r'D:\spssfiles'
findVar = 'salary'
savs = []
for fil in os.listdir(rDir):
if fil.endswith(".sav"):
savs.append(os.path.join(rDir,fil))
for sav in savs:
spss.Submit("get file '%s'."%sav)
if findVar.lower() in [varNam.lower() for varNam in spssaux.GetVariableNamesList()]:
print(sav)
end program.
Note: since I usually avoid all uppercasing in SPSS variable names, the result is identical to our case sensitive search.
Thanks for reading!
SPSS – Cloning Variables with Python
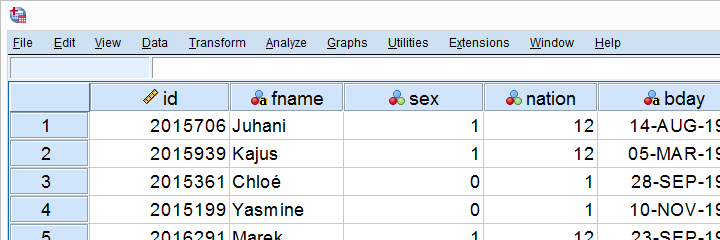
In this lesson, we'll develop our own SPSS Python module. As we're about to see, this is easier and more efficient than you might think. We'll use hotel-evaluation.sav, part of which is shown below.
Cloning Variables
Whenever using RECODE, I prefer recoding into the same variable. So how can I compare the new values with the old ones? Well, I'll first make a copy of some variable and then recode the original. A problem here is that the copy does not have any dictionary information.
We're going to solve that by cloning variables with all their dictionary properties. The final tool (available at SPSS Clone Variables Tool) is among my favorites. This lesson will deal with its syntax.
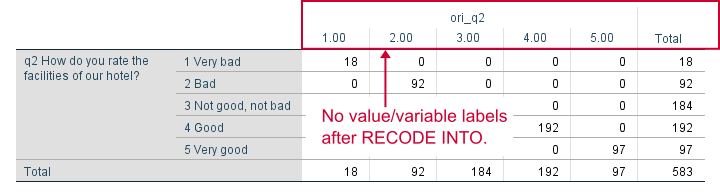
The RECODE Problem
Let's first demonstrate the problem with q2. We'll make a copy with the syntax below and compare it to the original.
*Show variable names, values and labels in output.
set tnumbers both tvars both.
*Set 6 ("no answer") as user missing value.
missing values q2 (6).
*Copy q2 into ori_q2.
recode q2 (else = copy) into ori_q2.
*Inspect result.
crosstabs q2 by ori_q2.
Result
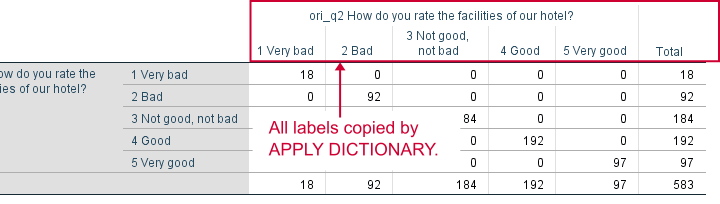
APPLY DICTIONARY
We could manually set all labels/missing values/format and so on for our new variable. However, an SPSS command that does everything in one go is APPLY DICTIONARY. We'll demonstrate it below and rerun our table.
apply dictionary from *
/source variables = q2
/target variables = ori_q2.
*Now we have a true clone as we can verify by running...
crosstabs q2 by ori_q2.
*Delete new variable for now, we need something better.
delete variables ori_q2.
Result
Create Clone Module
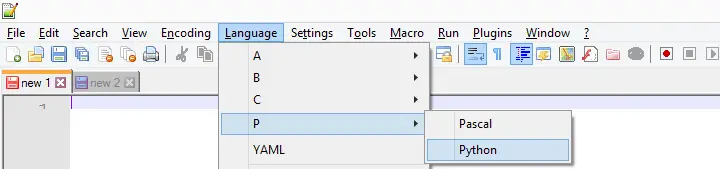
APPLY DICTIONARY as we used it here takes only one variable at a time. Therefore, cloning several variables is still cumbersome -at least, for now. We'll speed things up by creating a module in Notepad++. We'll first just open it and set its language to Python as shown below.
We now add the following code to our module in Notepad.
import spssaux
sDict = spssaux.VariableDict(caseless = True)
varList = sDict.expand(varSpec)
print(varList)
This defines a Python function which we call clone. It doesn't work yet but we're going to fix that step by step. For one thing, our function needs to know which variables to clone. We'll tell it by passing an argument that we call varSpec (short for “variable specification”).
Now which names should be used for our clones? A simple option is some prefix and the original variable name. We'll pass our prefix as a second argument to our function.
Move clone.py to Site-Packages Folder
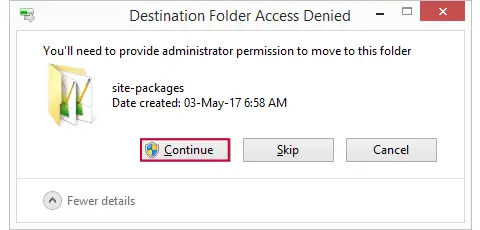
Now we save this file as clone.py in some easy location (for me, that's Windows’ desktop) and then we'll move it into C:\Program Files\IBM\SPSS\Statistics\24\Python\Lib\site-packages or wherever the site-packages folder is located. We may get a Windows warning as shown below. Just click “Continue” here.
Import Module and Run Function
We now turn back to SPSS Syntax Editor. We'll import our module and run our function as shown below. Note that it specifies all variables with SPSS’ ALL keyword and it uses ori_ (short for “original”) as a prefix.
begin program python3.
import clone
clone.clone(varSpec = 'all',prefix = 'ori_')
end program.
Result
Create New Variable Names
We'll now reopen clone.py in Notepad++ and develop it step by step. After each step, we'll save it in Notepad++ and then import and run it in SPSS. Let's first create our new variable names by concatenating the prefix to the old names and print the result.
New Contents Clone.py (Notepad++)
import spssaux
sDict = spssaux.VariableDict(caseless = True)
varList = sDict.expand(varSpec)
for var in varList:
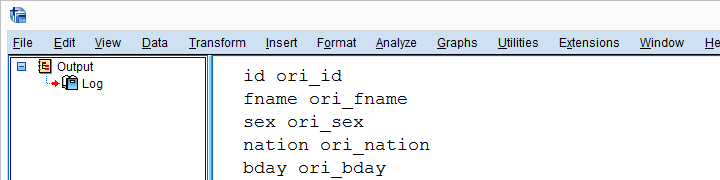
newVar = prefix + var # concatenation
print (var, newVar)
Because we already imported clone.py, Python will ignore any subsequent import requests. However, we do need to “reimport” our module because we made changes to it after our first import. We'll therefore reload it with the syntax below.
begin program python3.
import clone,importlib
importlib.reload(clone)
clone.clone(varSpec = 'all',prefix = 'ori_')
end program.
Result
Add RECODE and APPLY DICTIONARY to Function
We'll now have our function create an empty Python string called spssSyntax. We'll concatenate our SPSS syntax to it while looping over our variables.
The syntax we'll add to it is basically just the RECODE and APPLY DICTIONARY commands that we used earlier. We'll replace all instances of the old variable name by %(var)s. %(newVar)s is our placeholder for our new variable name. This is explained in SPSS Python Text Replacement Tutorial.
New Contents Clone.py (Notepad++)
import spssaux
spssSyntax = '' # empty string for concatenating to
sDict = spssaux.VariableDict(caseless = True)
varList = sDict.expand(varSpec)
for var in varList:
newVar = prefix + var
# three quotes below because line breaks in string
spssSyntax += '''
RECODE %(var)s (ELSE = COPY) INTO %(newVar)s.
APPLY DICTIONARY FROM *
/SOURCE VARIABLES = %(var)s
/TARGET VARIABLES = %(newVar)s.
'''%locals()
print(spssSyntax)
Just as previously, we reload our module and run our function with the syntax below.
begin program python3.
import clone,importlib
importlib.reload(clone)
clone.clone(varSpec = 'all',prefix = 'ori_')
end program.
Result
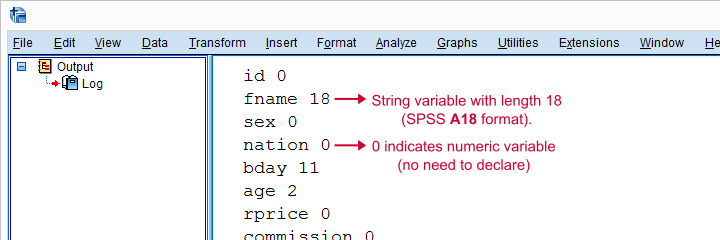
Check for String Variables
Our syntax looks great but there's one problem: our RECODE will crash on string variables. We first need to declare those with something like STRING ori_fname (A18). We can detect string variables and their lengths with sDict[var].VariableType This returns the string length for string variables and 0 for numeric variables. Let's try that.
New Contents Clone.py (Notepad++)
import spssaux
spssSyntax = ''
sDict = spssaux.VariableDict(caseless = True)
varList = sDict.expand(varSpec)
for var in varList:
newVar = prefix + var
varTyp = sDict[var].VariableType # 0 = numeric, > 0 = string length
print(var,varTyp)
spssSyntax += '''
RECODE %(var)s (ELSE = COPY) INTO %(newVar)s.
APPLY DICTIONARY FROM *
/SOURCE VARIABLES = %(var)s
/TARGET VARIABLES = %(newVar)s.
'''%locals()
print(spssSyntax)
(Reload and run in SPSS as previously.)
Result
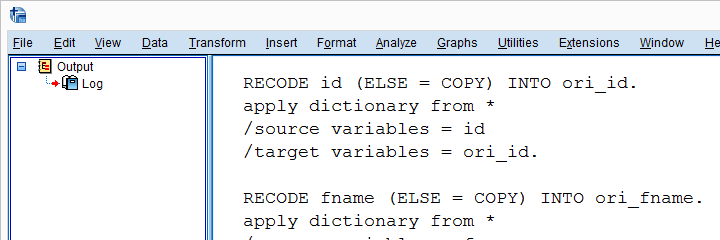
Declare Strings Before RECODE
For each string variable we specified, we'll now add the appropriate STRING command to our syntax.
import spssaux
spssSyntax = ''
sDict = spssaux.VariableDict(caseless = True)
varList = sDict.expand(varSpec)
for var in varList:
newVar = prefix + var
varTyp = sDict[var].VariableType # 0 = numeric, > 0 = string length
if varTyp > 0: # need to declare new string variable in SPSS
spssSyntax += 'STRING %(newVar)s (A%(varTyp)s).'%locals()
spssSyntax += '''
RECODE %(var)s (ELSE = COPY) INTO %(newVar)s.
APPLY DICTIONARY FROM *
/SOURCE VARIABLES = %(var)s
/TARGET VARIABLES = %(newVar)s.
'''%locals()
print(spssSyntax)
Run All SPSS Syntax
At this point, we can use our clone function: we'll comment-out our print statement and replace it by spss.Submit for running our syntax. As we'll see, Python now creates perfect clones of all variables we specified.
import spssaux,spss # spss module needed for submitting syntax
spssSyntax = ''
sDict = spssaux.VariableDict(caseless = True)
varList = sDict.expand(varSpec)
for var in varList:
newVar = prefix + var
varTyp = sDict[var].VariableType
if varTyp > 0:
spssSyntax += 'STRING %(newVar)s (A%(varTyp)s).'%locals()
spssSyntax += '''
RECODE %(var)s (ELSE = COPY) INTO %(newVar)s.
APPLY DICTIONARY FROM *
/SOURCE VARIABLES = %(var)s
/TARGET VARIABLES = %(newVar)s.
'''%locals()
spssSyntax += "EXECUTE." # execute RECODE (transformation) commands
#print(spssSyntax) # comment out, uncomment if anything goes wrong
spss.Submit(spssSyntax) # have Python run spssSyntax
Final Notes
Our clone function works fine but there's still one more thing we could add: a check if the new variables don't exist yet. Since today's lesson may be somewhat challenging already, we'll leave this as an exercise to the reader.
SPSS – Delete Selection of Variables with Python
Multivariate analyses are often plagued by missing values. A common strategy is to first remove any variables and cases with high percentages of missingness. We then sometimes use pairwise deletion of missing values or impute them.
Now, for finding variables with many missing values, you could
- ensure you specify user missing values;
- run a simple DESCRIPTIVES table;
- inspect which variables have relatively low N;
- type out a DELETE VARIABLES command containing those variable names and run it.
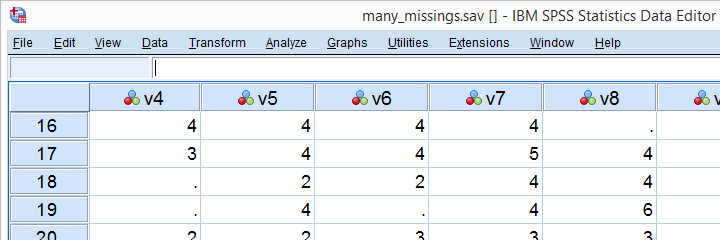
Now, if you've a vast number of variables or you run these steps routinely on different files, you might want to try and automate them. This lesson shows how to do so on many-missings.sav, part of which is shown below.
Inspect Case Count
A very simple way to find the number of cases in our data -ignoring any WEIGHT, FILTER or SPLIT FILE setting- is moving to the last case by pressing ctrl and ![]() and inspecting its case number.
and inspecting its case number.
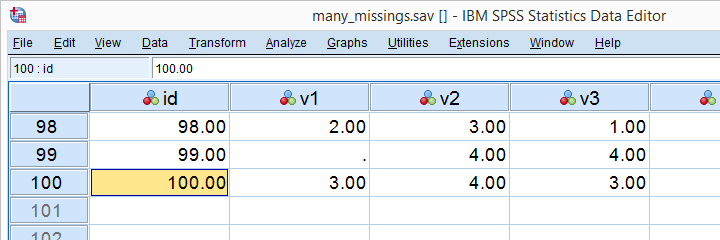
Our data contain 100 cases. By the way, an alternative way to obtain this number is to run SHOW N.
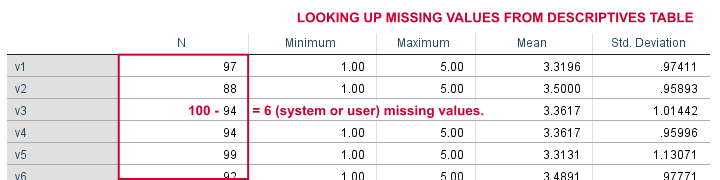
Run Basic Descriptives Table
For the data at hand, user missing values have already been set. We'll now follow part of our non-Python approach and run a basic descriptives table with DESCRIPTIVES v1 TO v20. Since we've 100 cases, (100 - N) is the number of missing values in each variable. We'll keep a screenshot of this table in Irfanview or some other program.
Look Up All Values in Single Variable
We'll first simply look up all values in our first variable, v1, with the syntax below.
begin program python3.
import spssdata
with spssdata.Spssdata("v1") as allData: # contains all values for v1
for case in allData: # for the 100 cases in our data
print(case)
end program.
Result
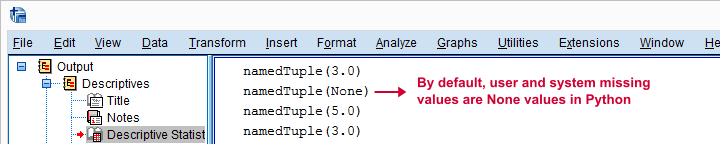
First off, Python returns each case as a namedTuple because it may hold several values. In this case it doesn't because we specified just one variable. We can extract the first -and only- value from a tuple with case[0] as we'll do in a minute.
Second, both system and user missing values result in None by default. We can thus obtain the number of missing values for a variable by counting the number of None values it holds. We'll do just that for v2 in the next syntax example.
Count None Values in Single Variable
begin program python3.
import spssdata
with spssdata.Spssdata("v2") as allData:
misCnt = 0 # missing values is 0 at first
for case in allData:
if case[0] is None: # system or user missing value
misCnt += 1 # add 1 to missing values
print(misCnt)
end program.
This returns 12. Our DESCRIPTIVES table confirms that v2 has (100 - 12 = ) 88 valid values.
Expand Range of Variables
You probably don't always want to loop over all variables but -rather- a range of adjacent variables specified with TO. In this case we'll have Python expand v1 TO v20 with the syntax below. This returns a Python list object of variable names that we'll loop over in a minute.
begin program python3.
import spssaux
sDict = spssaux.VariableDict(caseless = True) # allow wrong casing for variable names
varList = sDict.expand("v1 to v20")
print(varList)
end program.
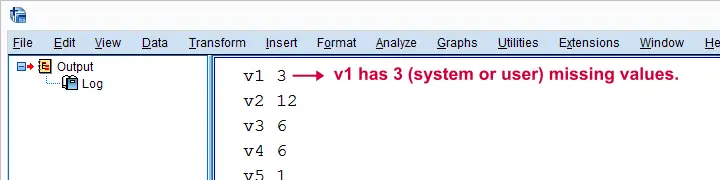
Find Missing Values for Each Variable
After creating our list of target variables, we'll loop over it and count the None values in each. Like so, the syntax below basically combines the pieces of syntax we presented so far in this lesson. We'll first just print each variable name and its number of missing values. Again, we can verify the entire result with our DESCRIPTIVES table.
begin program python3.
import spssaux,spssdata
sDict = spssaux.VariableDict(caseless = True)
varList = sDict.expand("v1 to v20")
for var in varList: # loop over v1 to v20
with spssdata.Spssdata(var) as allData:
misCnt = 0 # = count of missing values per variable
for case in allData:
if case[0] is None: # = missing value
misCnt += 1 # add 1 to counter
print(var,misCnt) # verify with DESCRIPTIVES table
end program.
Result
Create SPSS DELETE VARIABLES Syntax
We've chosen to delete all variables holding 15 or more missing values. We'll create a Python string called spssSyntax that initially just holds DELETE VARIABLES. We'll then concatenate each variable for which misCnt >= 15 and a space to it. Last, we'll add a period to our SPSS command and inspect it.
begin program python3.
import spssaux,spssdata,spss
spssSyntax = "DELETE VARIABLES "
sDict = spssaux.VariableDict(caseless = True)
varList = sDict.expand("v1 to v20")
for var in varList:
with spssdata.Spssdata(var) as allData:
misCnt = 0
for case in allData:
if case[0] == None:
misCnt += 1
if misCnt >= 15: # variable has at least 15 missing values
spssSyntax += var + ' ' # add variable name to DELETE VARIABLES
print(spssSyntax + ".") # add period to command
end program.
Delete Variables
Since our DELETE VARIABLES command looks great, we're basically there; we'll comment-out the print statement and replace it with spss.Submit for having Python run our SPSS syntax. Since this requires the spss module, we need to add it to our import command (line 4, below).
begin program python3.
import spssaux,spssdata,spss
spssSyntax = "DELETE VARIABLES "
sDict = spssaux.VariableDict(caseless = True)
varList = sDict.expand("v1 to v20")
for var in varList:
with spssdata.Spssdata(var) as allData:
misCnt = 0
for case in allData:
if case[0] is None:
misCnt += 1
if misCnt >= 15:
spssSyntax += var + ' '
#print spssSyntax + "."
spss.Submit(spssSyntax + ".")
end program.
Final Notes
That's it. Note that we could modify this syntax to remove constants (variables for which each case has the same value) from our data too. Or even variables with low variance. The basic limitation here is that any WEIGHT, FILTER or SPLIT FILE will be ignored but this is rarely an issue.
Thanks for reading!
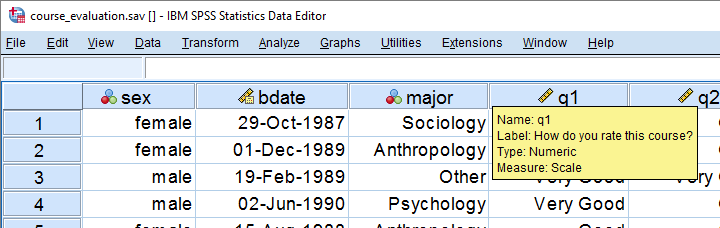
SPSS – Create New Files with Python
A teacher held a course evaluation. The data in SPSS format are in course-evaluation.sav, part of which is shown below. Students from different majors participated and now the education director wants separate Excel files for each major. A super easy way for creating these is by using SPSS with Python. We'll walk you through.
1. Save SPSS Data as Excel File
We'll first just create syntax for saving all data as a single Excel file from SPSS’ menu. We'll navigate to
![]() and fill it out as below.
and fill it out as below.
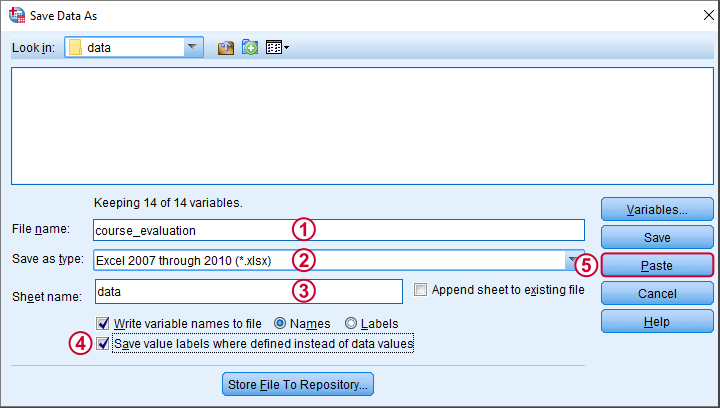
This results in the syntax below.
SAVE TRANSLATE OUTFILE='D:\data\course_evaluation.xlsx'
/TYPE=XLS
/VERSION=12
/FIELDNAMES
/CELLS=LABELS
/REPLACE.
2. Selecting Which Cases to Save
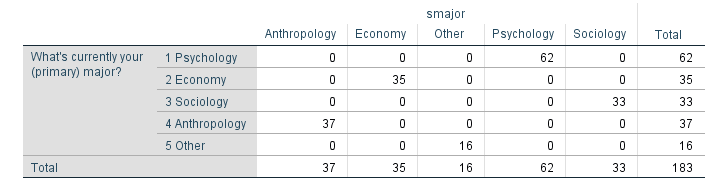
Our first syntax saves all cases -that is, all majors- as one Excel file. A neat way to save only a subset of cases -one major at the time- is using SELECT IF and preceding it with TEMPORARY. Like so, we could copy-paste-edit our syntax for each major. We'll have Python do just that for us. But first we'll convert our study majors into an SPSS string variable with the syntax below.
string smajor (a20).
compute smajor = valuelabel(major).
crosstabs major by smajor.
Result
3. Look Up Data Values with Spssdata
A Python SPSS module developed for looking up data values is spssdata. Doing so is super easy as shown by the syntax below. The main pitfall here is using the correct casing, which is spssdata.Spssdata.
begin program python3.
import spssdata
for case in spssdata.Spssdata('smajor'):
print(case)
end program.
Result
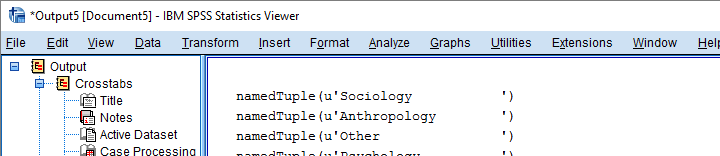
4. Cleaning Up Our Majors
As we see, Python returns a tuple for each case holding a student’s major as a Python string. We'll first extract this first (and only) element from each tuple by succeeding it with [0] as shown below.
Note that each major is right padded with spaces up to a total length of 20. This is because its variable format
in SPSS is A20. In Python, we'll remove these spaces with strip().
begin program python3.
import spssdata
for case in spssdata.Spssdata('smajor'):
print(case[0].strip())
end program.
5. Unduplicating Our Majors
At this point, Python retrieves all majors in a good, clean way. But since we only need the create one Excel file for each distinct major, we need to unduplicate these. We'll first create an empty Python list object. We'll then add each major to this list only if it's not yet in there.
begin program python3.
import spssdata
majors = []
for case in spssdata.Spssdata('smajor'):
major = case[0].strip()
if major not in majors:
majors.append(major)
print(majors)
end program.
Result

6. Create and Inspect SPSS Syntax
Our Python list of distinct majors looks great! If you're very paranoid, run
FREQUENCIES SMAJOR.
in SPSS to confirm that these really are the majors in our data. Now that we have this in place, we won't recreate it but proceed with the second step.
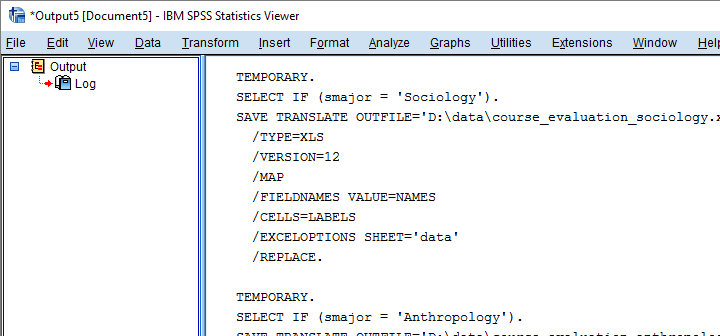
The syntax below first creates an empty Python string. Next, we'll loop over distinct majors and concatenate some SPSS syntax to it that we created earlier from the menu. In this syntax, we added %s which we use for a Python text replacement. The result is a substantial block of SPSS syntax which we'll first inspect.
begin program python3.
spssSyntax = ''
for major in majors:
spssSyntax += '''
TEMPORARY.
SELECT IF (smajor = '%s').
SAVE TRANSLATE OUTFILE='D:\data\course_evaluation_%s.xlsx'
/TYPE=XLS
/VERSION=12
/FIELDNAMES
/CELLS=LABELS
/REPLACE.
'''%(major,major.lower())
print(spssSyntax)
end program.
Result
7. Run Our Syntax
Since our syntax looks fine, we'll run it with spss.Submit. In order to use this, we still need to import the spss module because we hadn't done so thus far.
begin program python3.
import spss
spss.Submit(spssSyntax)
end program.
Result
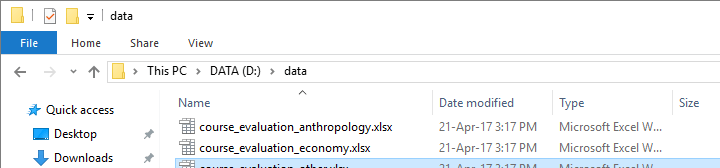
Final Notes
In short, Python can very easily look up data values with spssdata.Spssdata(). Restrict it to a single variable by specifying its name in the parentheses. Leaving the parentheses empty looks up the data values of all variables.
Once we have our data values in Python, we can insert them into SPSS syntax or do a ton of other stuff with them.
Thanks for reading!